


Simplify AWS Cloud Management with Terraform
Programmatic Access through AWS-CLI, Multiple Instance Creation & S3 Bucket Creation and destruction through IaC


Prerequisites
To deal with AWS using Iac(Infrastructure as Code) we need certain credentials:
AWS CLI(Command Line Interface): It is a CLI that helps the user to interact with aws management console and several other services using command lines.
NB: It doesn't come pre-installed in any instances so, you have to install it explicitly by the command
sudo apt-get install awscliIAM user: You need an IAM user apart from the root user and the user should have permission to access the services.
AccessKey & SecrerAccessKey: Generate the access key for the respective user and keep it handy for configuration with AWS CLI.
Configuration: Run the command
aws configureand give the access key and secret access key as below and the user will be configured.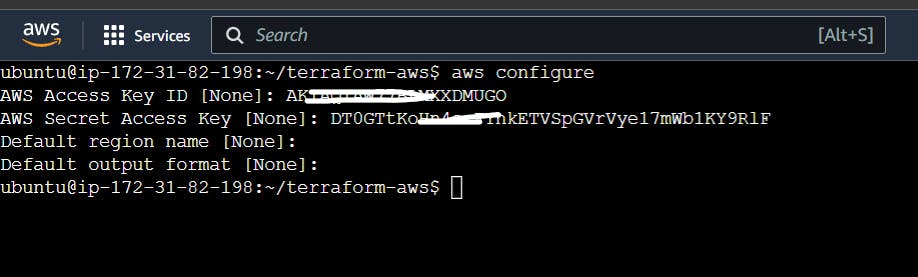
Exporting AccessKeys for Terraform: The access keys will be used while writing the terraform file so we need to use these keys as variables inside. So first, we have to declare them as environment variables using
exportthe as below:export AWS_ACCESS_KEY_ID=AKIAQIAW77BLMXXDUGO export AWS_SECRET_ACCESS_KEY=DT0GTtKoHn4scFYhkETVSpVrVye17mWb1KY9RlF
Creating EC2 instance & S3 Bucket using Terraform
main.tf
terraform {
      required_providers {

        aws =  {
                source = "hashicorp/aws"
                version = ">= 4.16"
                }

        }

        required_version = ">= 1.2.0"

}

provider "aws" {

        region = "us-east-1"
}

resource "aws_instance" "aws_ec2_instance" {

        ami = "ami-0557a15b87f6559cf"
        instance_type = "t2.micro"
        tags = {
                Name = "Terraform_Server2"
                }
}
resource "aws_s3_bucket" "bucket_form_terraform_by_rkn" {

        bucket = "aws-s3-bucket.bucket-form-terraform.ritesh"
        tags = {

                Name = "bucket_from_terraform_by_ritesh1"
                Environment = "DevQa"
                }
}
}
output "ec2_public_ips" {
        value = aws_instance.aws_ec2_instance[*].public_ip
        }
Explanation
terraform { } block
terraform {
      required_providers {

        aws =  {
                source = "hashicorp/aws"
                version = "-> 4.16"
                }

        }
This block specifies the required provider for the AWS resource type in the Terraform configuration.
Here's what this code block does:
terraform: This is the top-level block in a Terraform configuration file. It specifies the required Terraform version and other settings.required_providers: This is a sub-block under theterraformblock. It specifies the required providers for the resources in the configuration.aws: This is the name of the provider. In this case, it refers to the AWS provider.source: This specifies the location of the provider's source code. In this case, it's the HashiCorp AWS provider.version: This specifies the required version of the provider. In this case, it's-> 4.16, which means any version greater than or equal to 4.16 is acceptable.
By including this block in your Terraform configuration file, you are telling Terraform that your configuration requires the AWS provider version 4.16 or later, and that it should download and install the provider if it's not already installed.
provider { } block
provider "aws" {

        region = "us-east-1"
}
This is a Terraform configuration block for the AWS provider, specifying the region to use for resources created in the Terraform configuration.
Here's what this code block does:
provider: This is a top-level block in a Terraform configuration file that defines a provider to use in the configuration. In this case, it's the AWS provider."aws": This specifies the name of the provider to use. Terraform has built-in support for many providers, and"aws"specifies the AWS provider.region: This is a setting for the provider that specifies the region to use for resources created in the Terraform configuration. In this case, it's set to"us-east-1", which is the US East (N. Virginia) region.
By including this block in your Terraform configuration file, you are telling Terraform to use the AWS provider in the configuration and to create resources in the US East (N. Virginia) region.
You can modify the region value to specify a different region to use for resources in your configuration. Note that some resources may not be available in all regions, so you should consult the AWS documentation to determine which regions are suitable for your use case.
resource { } block
resource "aws_instance" "aws_ec2_instance" {

        ami = "ami-0557a15b87f6559cf"
        instance_type = "t2.micro"
        tags = {
                Name = "Terraform_Server2"
                }

}
Here's what this code block does:
resource: This is a top-level block in a Terraform configuration file that defines a resource to create in the infrastructure. In this case, it's an EC2 instance."aws_instance": This specifies the type of resource to create. Terraform has built-in support for many resource types, and"aws_instance"specifies an EC2 instance."aws_ec2_instance": This is a name for the EC2 instance resource that is being created. It is user-defined and can be any valid Terraform identifier.ami: This specifies the Amazon Machine Image (AMI) to use for the EC2 instance. In this case, it's set to"ami-0557a15b87f6559cf", which is the ID of an Amazon Linux 2 AMI.instance_type: This specifies the instance type to use for the EC2 instance. In this case, it's set to"t2.micro", which is a low-cost, general-purpose instance type.tags: This specifies a set of key-value pairs to tag the EC2 instance with. In this case, it's set to{ name = "Terraform_Server2" }, which creates a tag with the key"name"and the value"Terraform_Server2".
By including this block in your Terraform configuration file, you are telling Terraform to create an EC2 instance using the specified AMI and instance type in the AWS region specified by the provider block. The instance will also be tagged with the specified key-value pair.
You can modify the ami and instance_type values to specify a different AMI and instance type for your EC2 instance, respectively. You can also add additional tags or modify the existing tag values as needed.
output{ } block
output "ec2_public_ips" {
        value = aws_instance.aws_ec2_instance[*].public_ip
        }
Here's what this code block does:
output: This is a top-level block in a Terraform configuration file that defines an output that Terraform will generate after applying the configuration. In this case, it's an output for the public IP address of the EC2 instance."ec2_public_ips": This specifies the name of the output. It is user-defined and can be any valid Terraform identifier.value: This is a setting for the output that specifies the value of the output. In this case, it's set toaws_instance.aws_ec2_instance.public_ip, which references thepublic_ipattribute of theaws_instanceresource with the nameaws_ec2_instance.The
"[*]"syntax is used to select all instances created by the "aws_ec2_instance" resource. This means that if the configuration creates multiple instances, all of their public IP addresses will be returned in a list.
By including this block in your Terraform configuration file, you are telling Terraform to generate an output after applying the configuration that displays the public IP address of the EC2 instance created by the configuration.
terraform init
After creating the main.tf file we have to perform terraform init so that all the required dependencies will be downloaded.

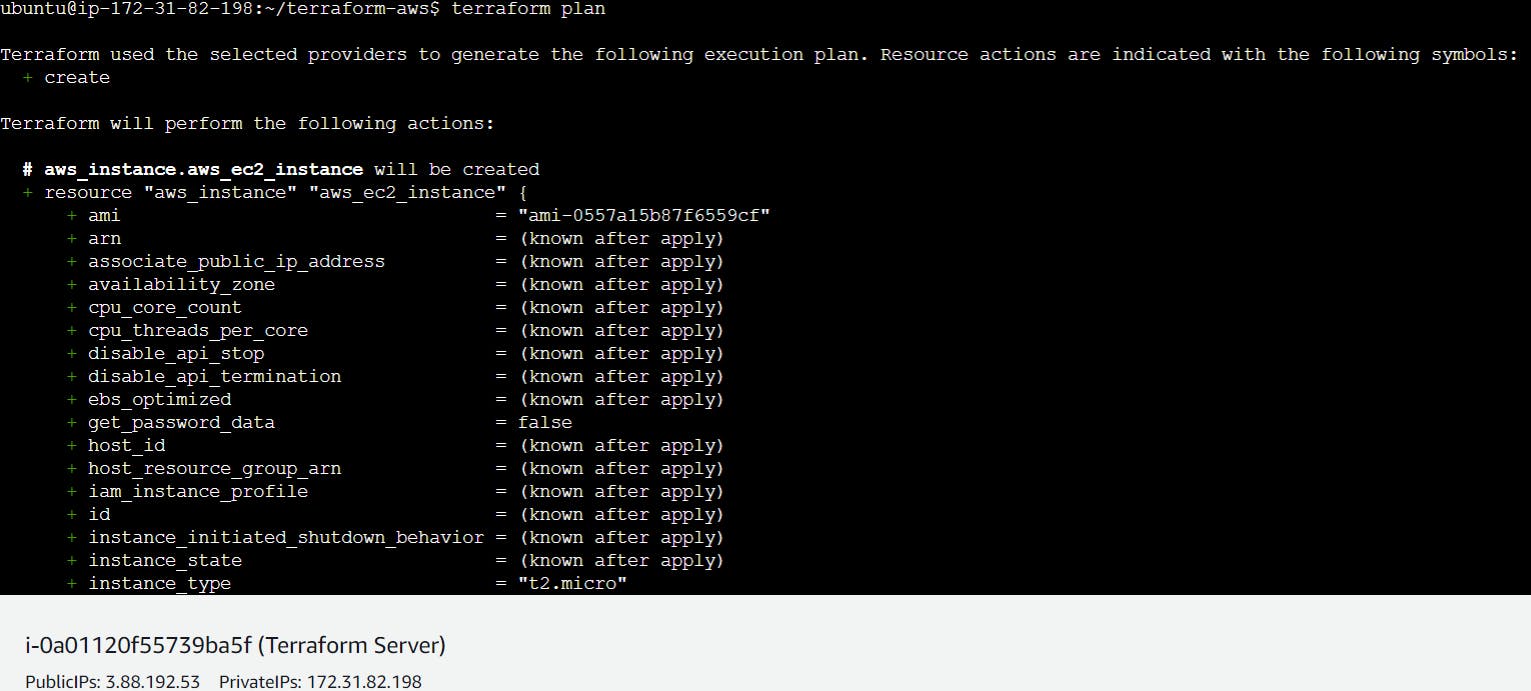
terraform plan
Once dependencies are downloaded we can see an executable blueprint made by terraform using terraform plan which will show the entire configuration on the basis of which the ec2 instance will be triggered.
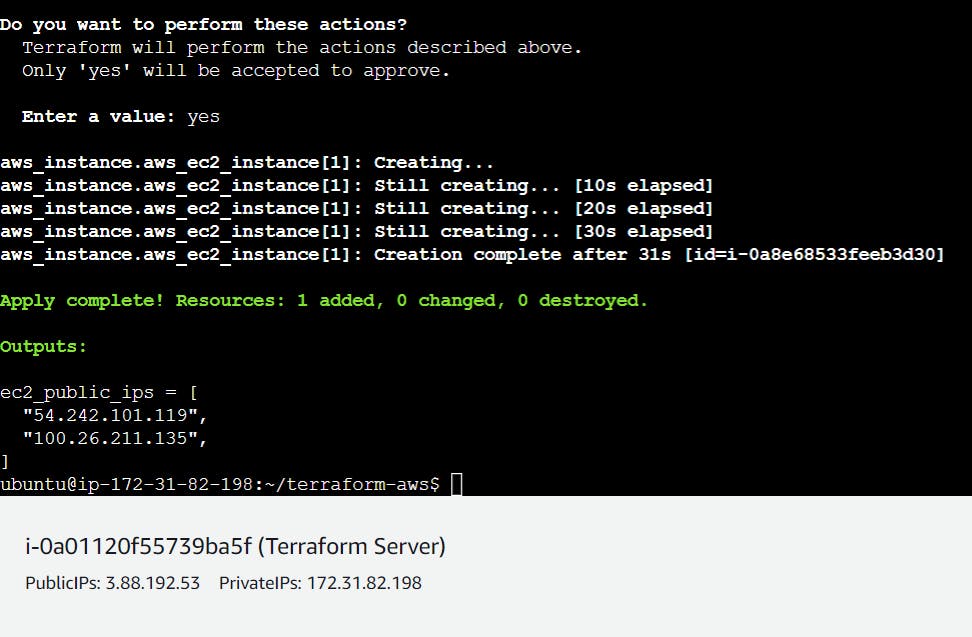
terraform apply
Once a blueprint is created we can simply apply it and it will trigger an ec2 instance with our defined instances.
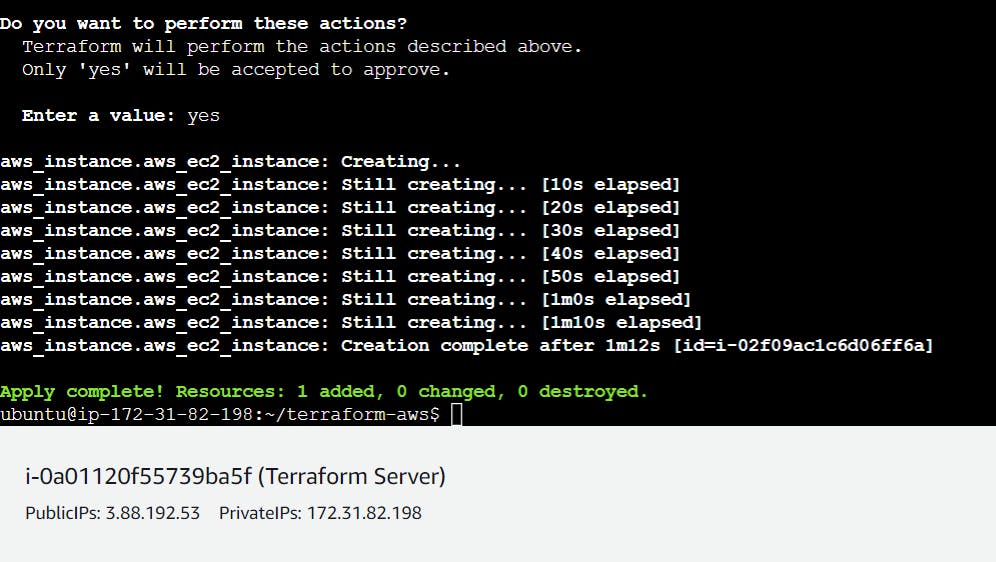
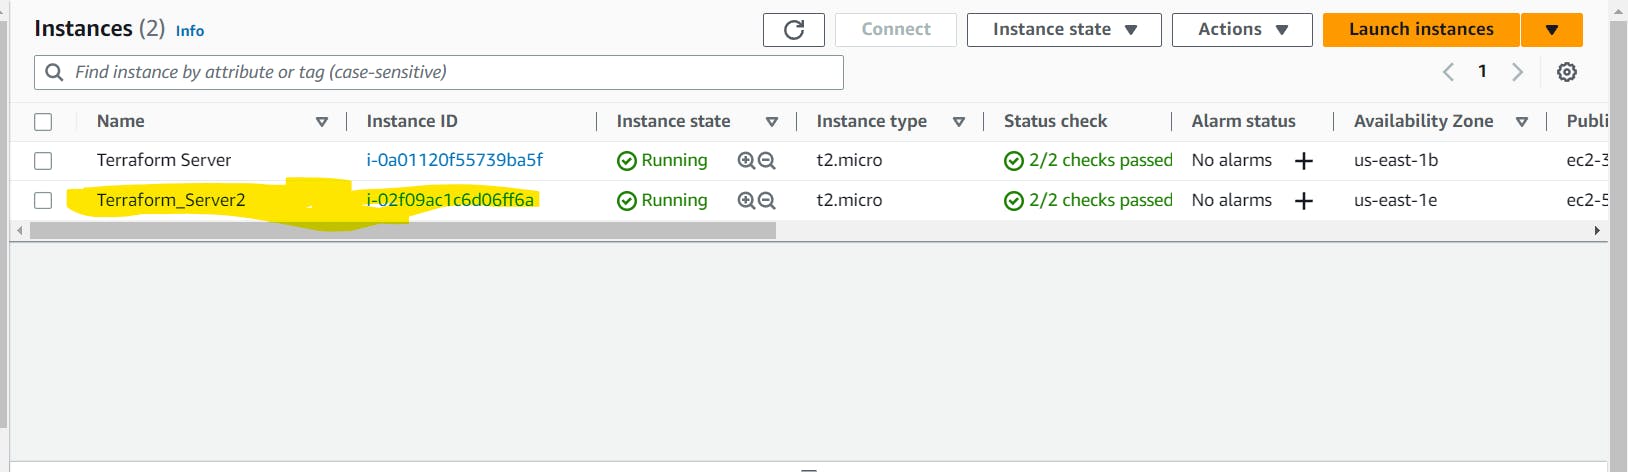
And now you can see above a new instance named Terraform_Server2 has been created.
Creating multiple instances
resource "aws_instance" "aws_ec2_instance" {
        count = 2
        ami = "ami-0557a15b87f6559cf"
        instance_type = "t2.micro"
        tags = {
                Name = "Terraform_Server2"
                }

}
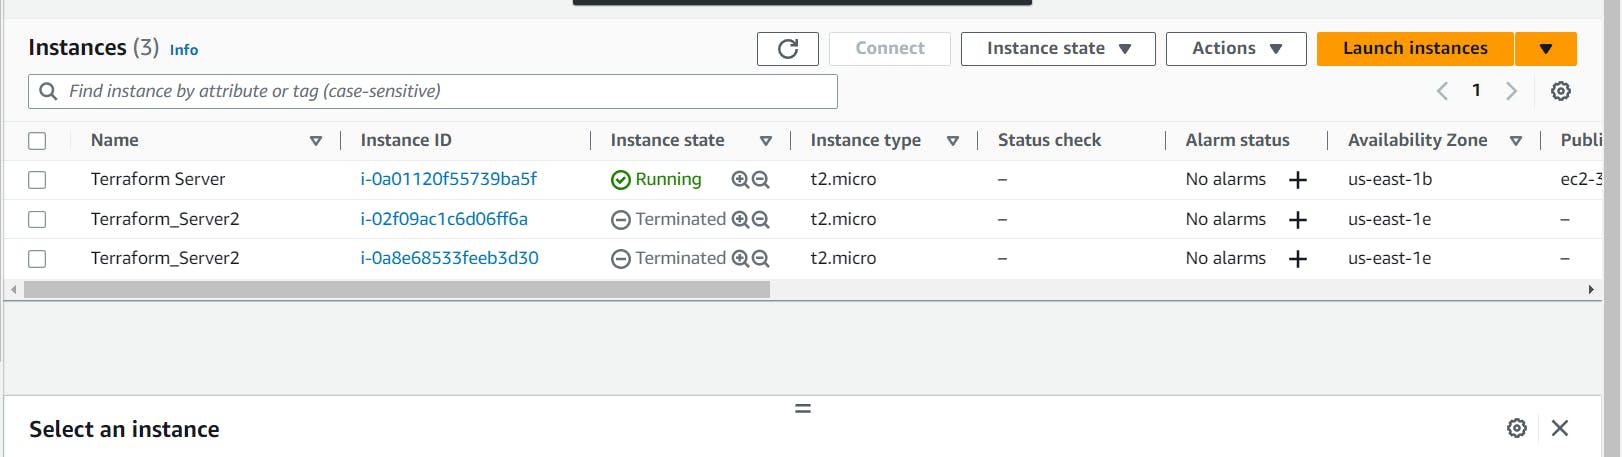
To create multiple instances all we need is to add another attribute count and assign the value as above and it will lunch the number of instances you have defined.
After defining the count as 2 when we reapplied it again started creating another instance as one instance was already created.

S3 bucket creation
resource "aws_s3_bucket" "bucket_form_terraform_by_rkn" {

        bucket = "aws-s3-bucket.bucket-form-terraform.ritesh"
        tags = {

                Name = "bucket_from_terraform_by_ritesh1"
                Environment = "DevQa"

                }
}
The "bucket" parameter specifies the unique name of the S3 bucket that Terraform will create. In this case, the bucket name is "aws-s3-bucket.bucket-form-terraform.ritesh".
The "tags" parameter is an optional map that allows you to add metadata to the bucket in the form of key-value pairs. In this case, the "Name" and "Environment" tags are defined with the values "bucket_from_terraform_by_ritesh1" and "DevQa", respectively.
aws-s3-bucket.bucket-form-terraform.ritesh named bucket has been created.

terraform destroy
terraform destroy is a command used to destroy the infrastructure created by a Terraform configuration. It will remove all the resources defined in the Terraform configuration file and any associated state files.
It's important to note that terraform destroy is a destructive command and cannot be undone. Before running this command, ensure that you have a backup of any important data and have verified that you want to destroy the infrastructure.

Now you can see 2 instances have been terminated.
NB: As you can see the name of the instances is the same for both instances. However, we can give different names for each instance using meta arguments such as count and for each count which we will be discussing going forward.
Meta Argument
In Terraform, meta-arguments are special arguments that can be used to control how resources are managed and provisioned. These arguments are used to specify configuration details that are not directly related to the resource being created but instead, provide additional information on how to create or manage the resource.'
There are several meta-arguments available in Terraform, including:
depends_on: This argument is used to specify dependencies between resources. Terraform uses this information to determine the order in which resources should be created or destroyed.count: This argument is used to create multiple instances of a resource, each with a unique set of attributes.lifecycle: This argument is used to specify how Terraform should handle the lifecycle of a resource. For example, you can use this argument to prevent a resource from being destroyed or to ignore changes to certain attributes.provider: This argument is used to specify the provider used to create a resource. Providers are plugins that Terraform uses to interact with specific services, such as AWS or Google Cloud.provisioner: This argument is used to specify how to provision a resource after it has been created. For example, you can use this argument to execute scripts or run configuration management tools like Ansible or Chef.
Meta-arguments are an important part of Terraform's flexibility and can be used to customize the behavior of resources to fit your specific needs.
main.tf with count
terraform {
        required_providers {
                aws = {
                     source = "hashicorp/aws"
                     version = ">= 4.16"
                        }
        }
        require_version = ">=1.2.0"
}

provider "aws" {
        region = "us-east-1"
}
resource "aws_instance" "aws_ec2_test" {
        count = 4
        ami = "ami-0557a15b87f6559cf"
        instance_type = "t2.micro"
        tags = {
                Name = "TerraformServer- ${count.index}"
                }
        }
Once you apply the terraform apply it will create 4 new instances with different names as per the index below:
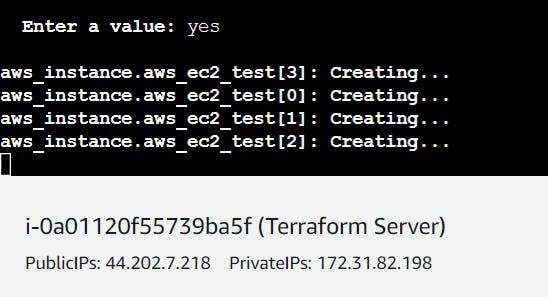
In the above main.tf file we have used ${count.index} which is treated as a variable referring to the index of the count. Here each instance is triggered and named with its index number.
main.tf with for-each
terraform {
        required_providers {
                aws = {
                     source = "hashicorp/aws"
                     version = ">= 4.16"
                        }
        }
        require_version = ">=1.2.0"
}

provider "aws" {
        region = "us-east-1"
}

locals {
        instanceNames = toset(["Server-Dev","Server-QA","Server-UAT","Server-Staging"])
}

resource "aws_instance" "aws_ec2_test" {
        for_each = local.instanceNames
        ami = "ami-0557a15b87f6559cf"
        instance_type = "t2.micro"
        tags = {
                Name = each.key
                }
        }
In the above snippet, you can notice the differences which are :
We have added a new block as
locals {toset(....)}: Here toset() is a method that converts a list to a set because for-each works only on sets as it contains unique values.Replaced the
count=4withfor_each = locals.instanceNames: for_each work on iteration. It will iterate through the set instanceNamesChanged the name to
each.key: Once the for_each iteration startseach.keywill hold one value per iteration and pass it as a name. Here the names of the instances will be named as the names present in the instanceNames set.
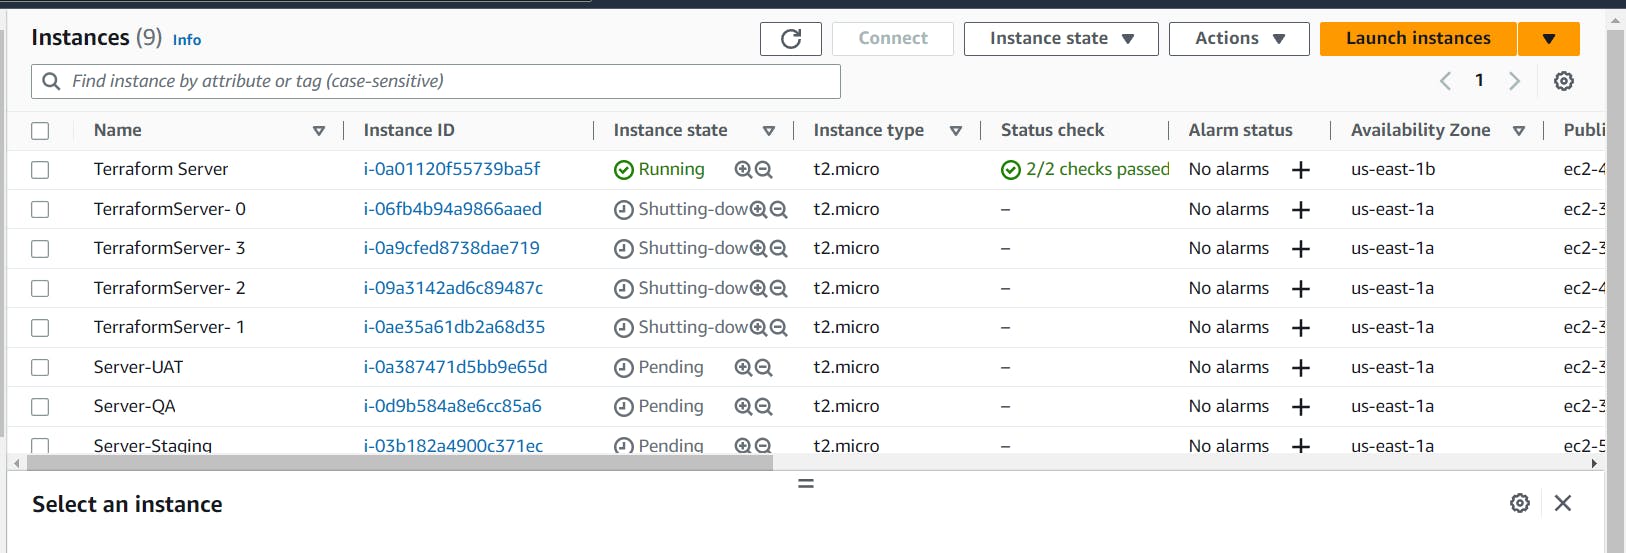
Once you apply these changes terraform will destroy all the previous instances and will recreate new instances with respective names as below.

Creating instances with Different AMI and Names
Scenario: If you have a requirement that says you need 4 instances of different OS and also different instance names respectively.
To resolve the above scenario, we can use map instead of Set. As you know Map data structure consists of data in a key-value pair manner. Accordingly the main.tf code will look be changed as below:
terraform {
        required_providers {
                aws = {
                     source = "hashicorp/aws"
                     version = ">= 4.16"
                        }
        }
        require_version = ">=1.2.0"
}

provider "aws" {
        region = "us-east-1"
}

locals {
        instanceNames = instanceNames = {"Server-Dev":"ami-005f9685cb30f234b","Server-QA":"ami-0557a15b87f6559cf","Server-UAT":"ami-005f9685cb30f234b","Server-Staging":"ami-0557a15b87f6559cf"}
}

resource "aws_instance" "aws_ec2_test" {

        for_each = local.instanceNames
        ami = each.value
        instance_type = "t2.micro"
        tags = {
                Name = each.key
                }
        }
The
locals{ }block has been changed with key-value pair that contains Server Name as Key and AMI Id as the value whereami-005f9685cb30f234bandami-0557a15b87f6559cfare AWS-Linux and Ubuntu respectively.In the resource { } block
ami = each.valuewhich means the value of the instanceNames map has been changed and assigned to variable ami and intags { }blockName = each.keythe key is assigned to Name.
